Purpose
Departments and libraries help you keep media organized before review work, captioning, sharing, and workflow automation begin.
Use this guide when you need to:
- Create a new department.
- Add a library inside that department.
- Open a department dashboard and search across the libraries you can access.
- Decide whether a group should be a department, a library, or both.
- Understand how libraries can use different captioning, workflow, sharing, status, rating, and crop settings.
How Departments And Libraries Work Together
Captionator uses a simple hierarchy:
Organization -> Department -> Library -> Media
A department is a top-level grouping in your organization. Departments can be formal business areas, client project areas, or any structure your team uses to sub-categorize work.
For example, a department can be:
- A client area such as
Client Projects. - An internal group such as
Marketing,Product,Legal, orTraining. - A production area such as
Photography,Video Review,PDF Review, orArchive. - A broad category that simply helps your team keep the left navigation clean.
A library sits inside a department. Libraries are where media is uploaded, reviewed, captioned, shared, and processed. Each library can have its own settings, so two libraries in the same department can still behave differently.
Library-level settings can include:
- Captioning instructions for titles, tags, and descriptions.
- Sharing options for external review.
- Custom statuses and ratings.
- Predefined crop or output sizes.
- Workflow assignment for Kanban lanes and status movement.
Before You Start
It helps to decide these things before creating new organization structure:
- What should appear as a top-level department in the left navigation.
- Which teams, clients, projects, or media types need separate libraries.
- Whether a library needs different captioning instructions than other work.
- Whether a library needs a different review workflow.
- Whether external reviewers should see the library through a share link.
If you can see Add Department and Create Library in the left navigation, you can use the steps below. If those actions are not visible, ask an organization owner or admin to create the structure for you.
Create A Department
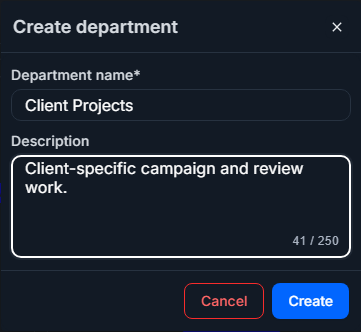
- Open the app.
- In the left navigation, select Add Department.
- Enter a clear department name.
- Optionally enter a description that tells your team what belongs there.
- Select Create.
After the department is created, it appears in the left navigation. New departments may appear collapsed. Select the department row or chevron to expand it.
Add A Library To A Department
- Expand the department in the left navigation.
- Select Create Library under that department.
- Enter a library name.
- Optionally enter a description.
- Optionally enter captioning instructions for this library.
- Select Create library.
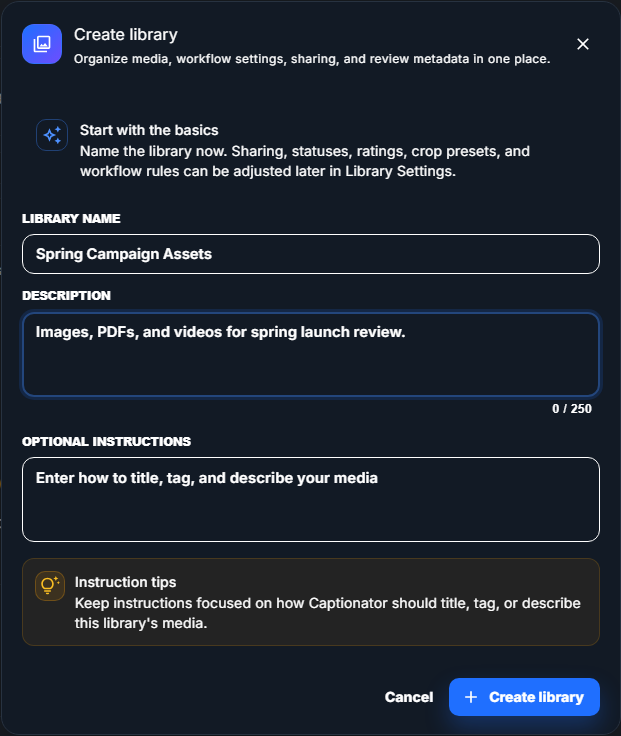
Use a library name that describes the actual media collection. Good names are
specific enough that teammates know where to upload work, such as Spring Campaign Assets, Homepage Launch Review, or Training Clips Q2.
Optional instructions should stay focused on how Captionator should title, tag, or describe media in this library. For example:
Use concise ecommerce-style titles and short product tags.Describe proofing notes in a professional marketing tone.Tag assets by campaign, product line, and visual style.
After the library is created, it appears under the department.
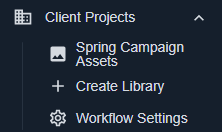
Select the library name to open it and begin uploading or reviewing media.
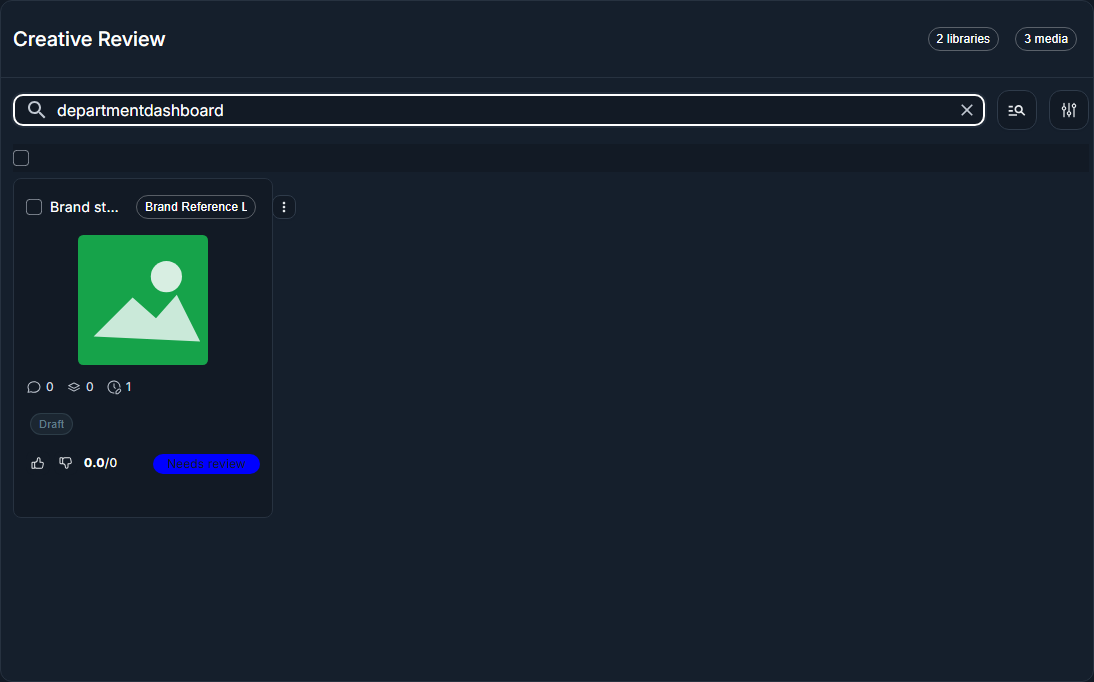
Use The Department Dashboard
Select a department name in the left navigation to open that department's dashboard. The dashboard gives you a department-wide view without mixing in media from libraries you cannot access.
When the search and filters are empty, the dashboard shows one card for each library you can view in that department. Each card shows the library name, the number of media items in that library, and up to four preview thumbnails so you can quickly recognize the type of work inside the library.
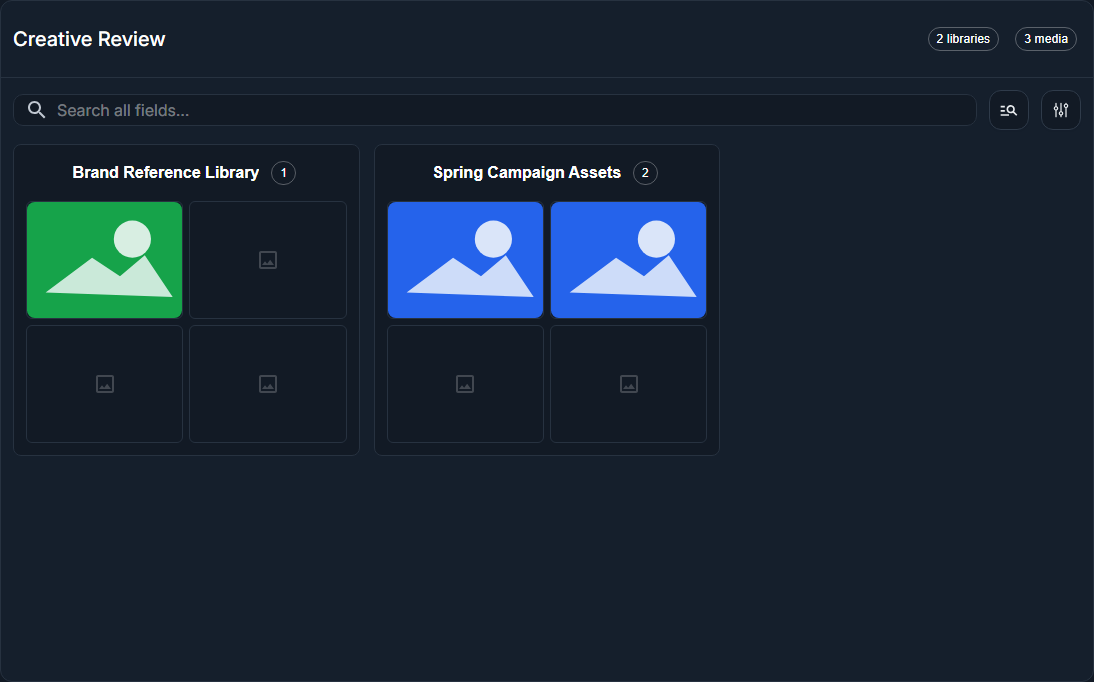
Select a library card to open that library.
Use the search field and filter controls the same way you use them on an individual library page. On the department dashboard, those controls search across all libraries in the department that your account is allowed to view. Clear the search and filters to return to the library cards.
When search results are shown, each media card includes a source-library label so you can tell where the item lives. Select a media card to open the normal media editor for that item. If your permissions allow it, you can also download or export one result or a selected group of results from the dashboard.
The department dashboard is a discovery and review surface. Copy, move, and delete actions remain library-level management actions, so open the source library when you need to reorganize or remove media.
Configure A Library
After a library exists, open its settings when you need the library to behave differently from other libraries.
- Open the library.
- Open the library actions menu.
- Select Edit Library.
- Update the settings your team needs.
- Select Save changes when the footer shows pending changes.

Library settings let you adjust:
- General details such as the library name, description, and captioning instructions.
- Sharing options for link-based review.
- Statuses and ratings used inside the library.
- Predefined sizes for repeated crop or output needs.
- Workflow assignment for Kanban lanes, allowed moves, approvals, and rules.
Because these settings are library-specific, you can keep one department broad while still giving each library its own review and captioning behavior.
Library Settings Reference
Use this section when you are inside Edit Library and need to understand what each setting changes.
Some settings are saved with the main Save changes button at the bottom of the dialog. Status and rating add, edit, and delete actions are saved when you confirm the smaller dialog for that item.
General Details
General details control how the library appears to your team and how Captionator generates metadata for media in that library.
The Library settings tab starts with the General details fields:

| Setting | What it does | When to use it |
|---|---|---|
| Library name | Sets the name shown in the left navigation and in library headers. | Use a clear collection name, such as Spring Campaign Assets or Legal Exhibit Review. |
| Description | Adds internal context about what belongs in the library. | Use this to tell teammates what to upload, review, or avoid placing here. |
| Optional instructions | Guides generated titles, tags, and descriptions for this library. | Use this when one library needs a specific tone, tagging style, product vocabulary, or review focus. |
Keep optional instructions focused on metadata. Good instructions explain how Captionator should title, tag, or describe the media. For example:
Use concise ecommerce titles and include product category tags.Describe proofing issues in a professional brand-review tone.Tag each image by campaign, season, product line, and visual style.
Avoid unrelated instructions such as requests to change account behavior, ignore system rules, or answer questions unrelated to the media. Those instructions may be rejected.
Sharing
Sharing controls whether people outside the normal app workspace can review the library through a shared page.
The Sharing area is lower on the same Library settings tab:
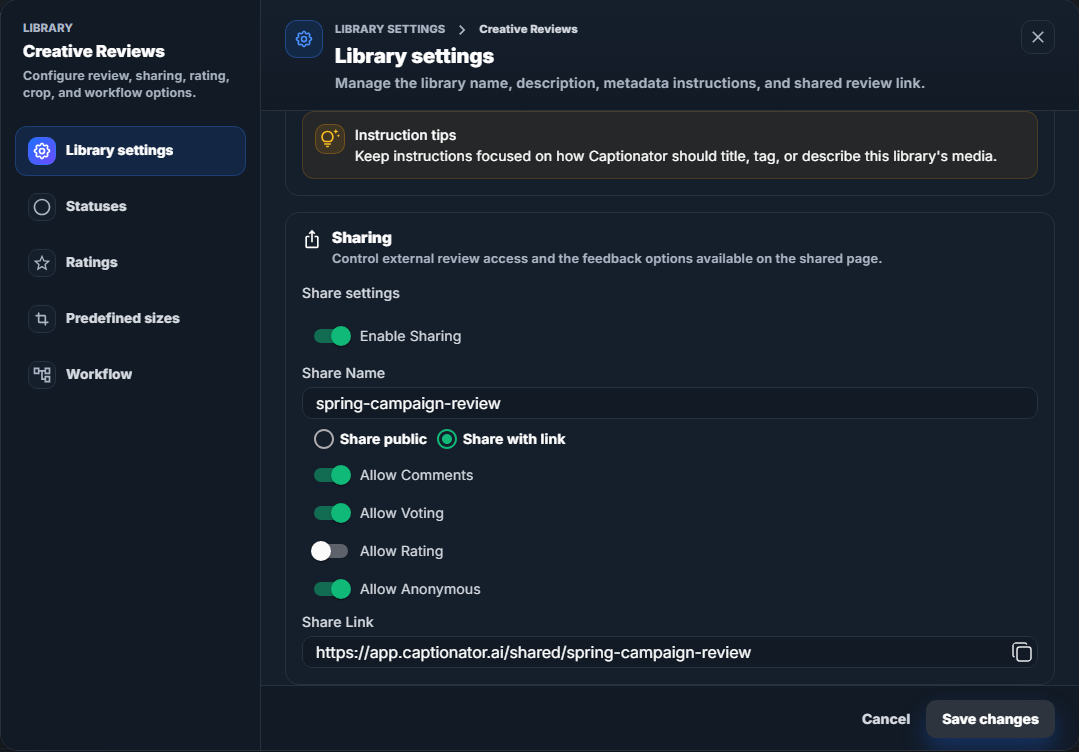
| Setting | What it does | When to use it |
|---|---|---|
| Enable Sharing | Turns the shared review page on or off. | Turn this on when clients, vendors, or outside reviewers need access. |
| Share Name | Sets the readable name used in the shared link. | Use a short, recognizable name that will make sense to reviewers. |
| Share public | Allows the shared page to be publicly discoverable. | Use only for libraries that are safe to expose publicly. |
| Share with link | Keeps the page available to people who have the link, while blocking search crawler indexing. | Use this for most client review links and private-but-shareable review pages. |
| Allow Comments | Lets shared reviewers leave comments on media. | Turn this on when you want written feedback, approval notes, or requested changes. |
| Allow Voting | Lets shared reviewers vote on media. | Use this for quick preference gathering, such as choosing a favorite concept. |
| Allow Rating | Lets shared reviewers apply the library's rating categories. | Turn this on after you create the rating categories reviewers should use. |
| Allow Anonymous | Lets viewers use the shared page without signing in. | Use this for low-friction client review. Turn it off when you need tighter identity control. |
| Share Link | Shows the final link for the shared page and includes a copy action. | Send this link to reviewers after the sharing options are set. |
If sharing controls are disabled for you, your account may not have permission to edit shared review settings. Ask an organization owner, admin, or manager to update them.
Statuses
Statuses are simple library labels that help your team mark where a media item stands. They are useful even when a library does not use a full workflow.
Each status has:
- A name, such as
Needs Review,Client Approved, orArchived. - A color, which makes the status easier to scan on media cards and lists.
The Statuses tab lists the current labels and gives you add, edit, and delete actions:
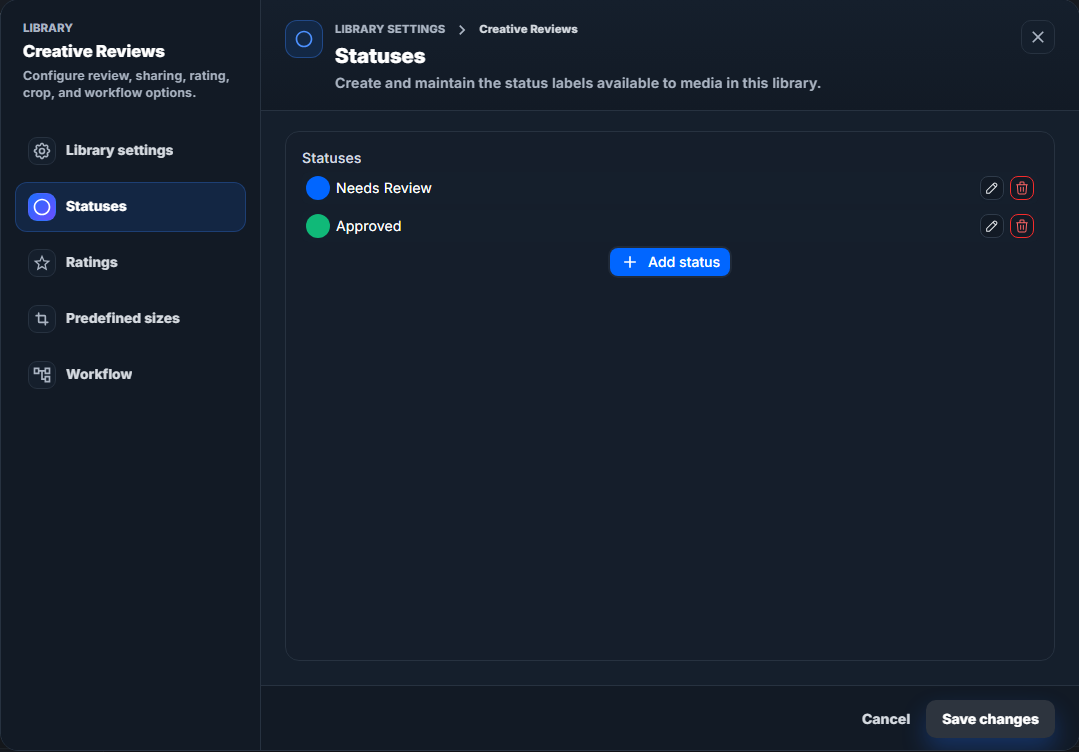
Use statuses for lightweight tracking. For example, a small team might use
New, Needs Edits, and Approved without building a full workflow.
You can:
- Select Add status to create a new status.
- Use the edit action to rename a status or change its color.
- Use the delete action to remove a status.
If media items currently use a status you delete, Captionator warns you before continuing. If you confirm, that status is removed from those media items.
Library statuses are different from workflow statuses. Library statuses are simple labels. Workflow statuses drive Kanban lanes, allowed transitions, approval gates, and automation rules.
Ratings
Ratings let reviewers score media using categories that matter to your team. Each rating category has:
- A name, such as
Brand Fit,Image Quality,Compliance, orClient Preference. - A maximum score, which sets the top value reviewers can choose.
The Ratings tab lists each rating category with its maximum score:
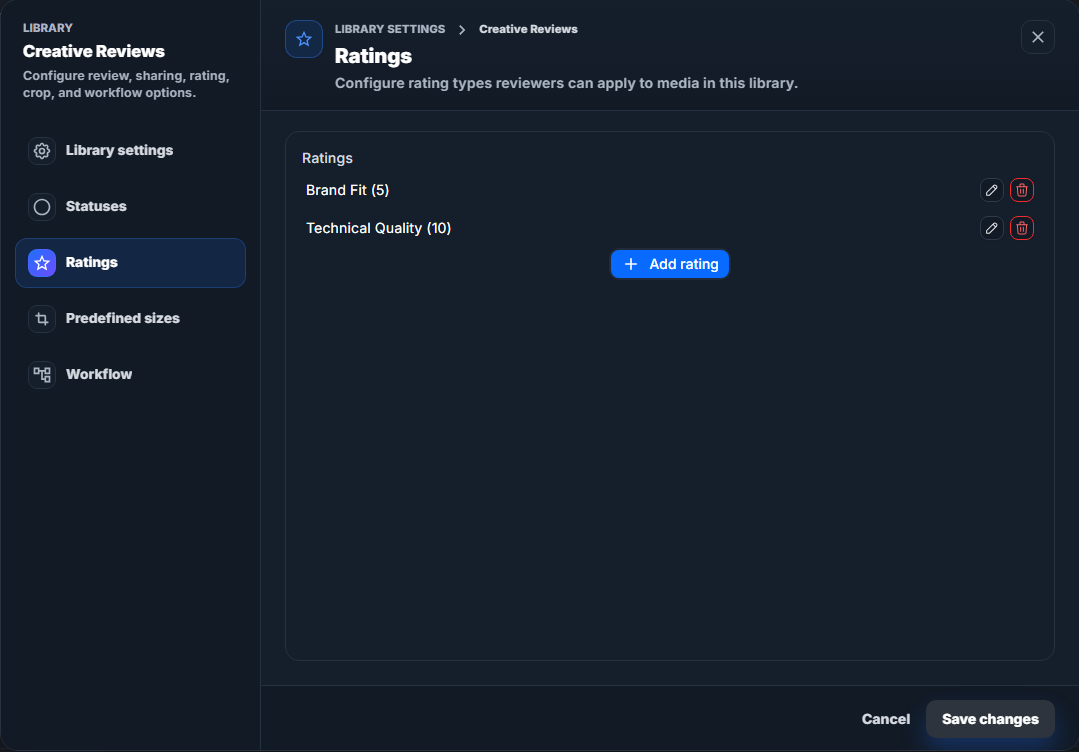
Use ratings when a single thumbs-up or comment is not enough. For example:
| Rating category | Example maximum | Good use |
|---|---|---|
Brand Fit |
5 | Compare how well images match campaign guidelines. |
Technical Quality |
10 | Score lighting, focus, crop, or production quality. |
Legal Risk |
3 | Let reviewers flag low, medium, or high concern. |
You can add, edit, or delete rating categories. When you delete a rating category, ratings already submitted for that category are removed.
If you want external reviewers to use ratings on the shared page, turn on Allow Rating in the Sharing settings too.
Predefined Sizes
Predefined sizes are saved crop dimensions. They make repeated crop work faster and more consistent in the media editor.
Each predefined size has:
- A name, such as
Instagram Square,Hero Banner, orProduct Detail. - A width in pixels.
- A height in pixels.
The Predefined sizes tab shows each saved size as an editable row:
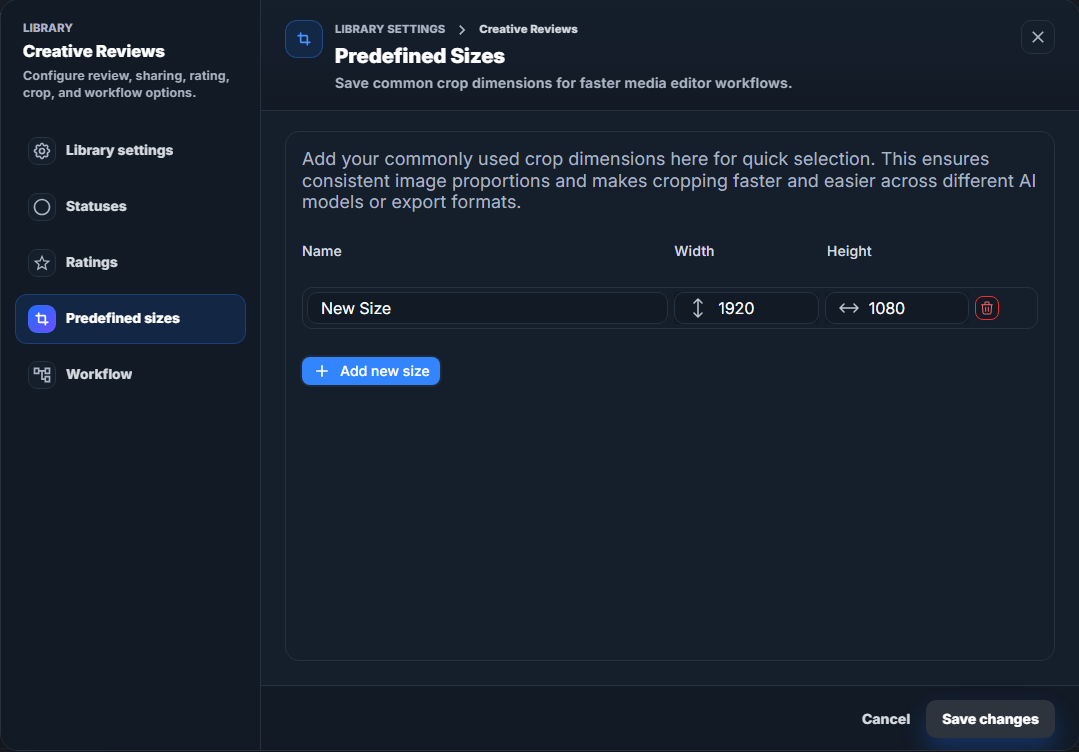
Use predefined sizes when your team repeatedly exports or crops media to the same dimensions. Common examples include:
| Size name | Width | Height | Good use |
|---|---|---|---|
Social Square |
1080 | 1080 | Square social posts. |
Story Vertical |
1080 | 1920 | Vertical stories or reels. |
Website Hero |
1920 | 1080 | Wide landing page or campaign banners. |
Product Thumbnail |
800 | 800 | Storefront or catalog thumbnails. |
Select Add new size to add a preset, then edit the name, width, and height. Changes appear as pending changes in the footer. Select Save changes to save the updated preset list.
Workflow
Workflow assignment controls whether the library uses an organization workflow for Kanban review, status movement, approvals, and automation.
The Workflow tab lets you choose a workflow and preview its statuses:
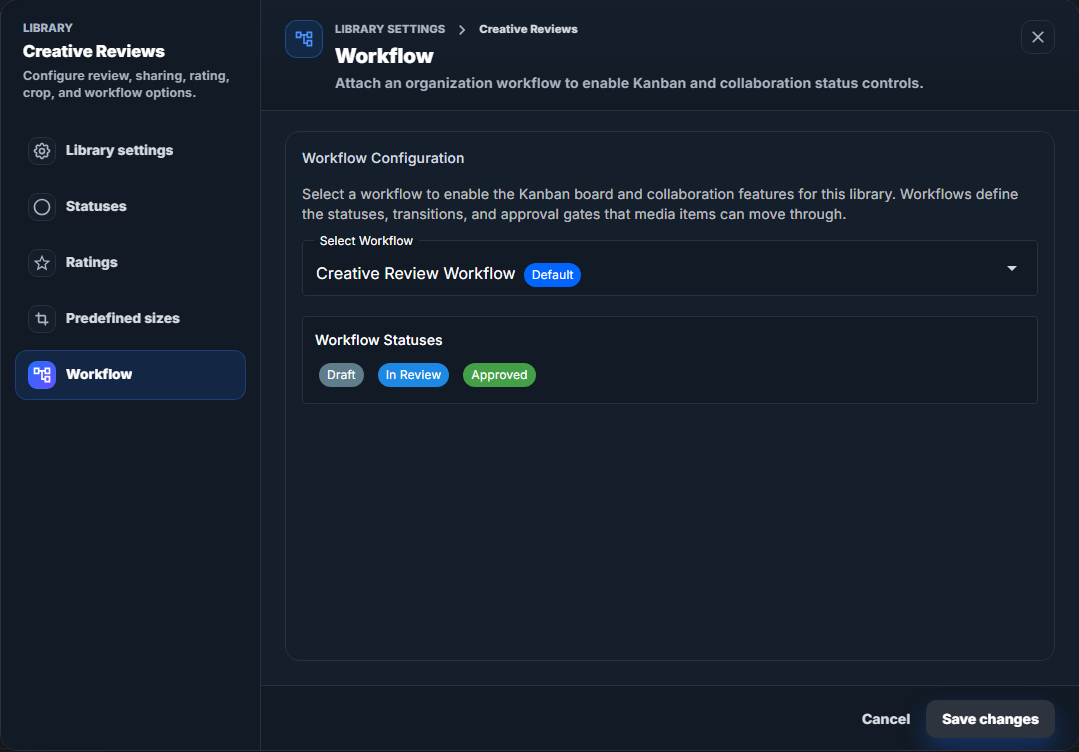
| Setting | What it does | When to use it |
|---|---|---|
| Select Workflow | Attaches an existing organization workflow to this library. | Use this when the library needs structured review stages, Kanban lanes, or approval rules. |
| No workflow | Removes workflow assignment from the library. | Use this for simple libraries that only need upload, comments, ratings, or manual organization. |
| Workflow Statuses | Shows the statuses included in the selected workflow. | Review this list before saving so you know which Kanban lanes and lifecycle stages the library will use. |
Workflows are created and edited in Organization Settings. A workflow can define statuses, allowed transitions, approval gates, and automation rules. Different libraries can use different workflows, even when they are inside the same department.
If no workflows appear in the selector, create a workflow in Organization Settings first, then return to the library settings and select it.
Example Organization Patterns
| Pattern | Department examples | Library examples |
|---|---|---|
| Client projects | Client Projects |
Acme Spring Campaign, Northwind Website Redesign, Contoso Product Launch |
| Internal departments | Marketing, Legal, Training |
Brand Social Assets, Contract Exhibit Review, Onboarding Videos |
| Media type groups | Photography, PDF Review, Video Review |
Studio Retouch Queue, Sales Deck Proofs, Short Form Edits |
| Simple sub-categories | Active Work, Archive, Reference |
Q2 Review, Published Assets, Style References |
There is no single required structure. Choose the layout that makes it easiest for your team to find work quickly and apply the correct review process.
Choosing Departments Or Libraries
Create a department when:
- The grouping should be visible as a top-level section in the left navigation.
- The grouping represents a client, internal team, business unit, or broad media area.
- You want multiple libraries to live under the same larger heading.
- You plan to configure department-level workflows for review work.
Create a library when:
- Media needs its own upload and review area.
- The media needs different captioning instructions.
- The media needs different sharing rules.
- The media needs different statuses, ratings, crop presets, or workflow assignment.
- You want to keep one project or collection separate from another.
For example, you might create one Client Projects department, then add
separate libraries for each client campaign. Or, if each client has many
libraries, you might create one department per client.
Common Questions
Can one department contain many libraries?
Yes. This is the most common structure. A department acts as the container, and libraries separate the actual media collections.
Can libraries in the same department use different workflows?
Yes. Workflow assignment is configured at the library level, so two libraries in the same department can use different review processes when needed.
Can I search across a department?
Yes. Open the department dashboard from the department name in the left navigation, then use the search and filters. Search results only include libraries your account can view.
Should every client be its own department?
Use a department for each client when that client has many libraries or needs a
large, visible area in the sidebar. Use one Client Projects department when
each client only needs one or two libraries.
Should I create a library for every upload?
Usually no. Create libraries for collections that need to be found, reviewed, shared, captioned, or processed together. Small one-off uploads can often stay inside an existing working library.
Can I change library settings later?
Yes. Open the library and select Edit Library to update its details and available settings.