Purpose
Workflows define how media moves through a review process. A workflow gives a department its status lanes, allowed status moves, approval requirements, and optional automation rules.
Use this guide when you need to:
- Create a workflow for a department.
- Rename a workflow.
- Add, reorder, recolor, or remove statuses.
- Define which status changes are allowed.
- Require comments or approvals before an item can move.
- Add automation rules for repeated review steps.
- Attach the workflow to a library so the Kanban board can use it.
Before You Start
You need owner or admin access to the organization. Workflows are configured at the organization level, then attached to one or more libraries.
It helps to decide these things before opening the editor:
- Which department owns the process.
- The status names users should see as Kanban lanes.
- Which moves are allowed between statuses.
- Which roles can make each move.
- Whether any move needs a comment or approval.
- Whether repeated steps should be automated with rules.
Good workflow status names are short and action-oriented: Draft,
In Review, Approved, Needs Fixes, or Published.
Open Workflow Settings
- Open the app.
- Select Organization in the left navigation.
- In Organization Settings, select Workflows.
- Find the department you want to configure.
You will see a department workflow list like this:
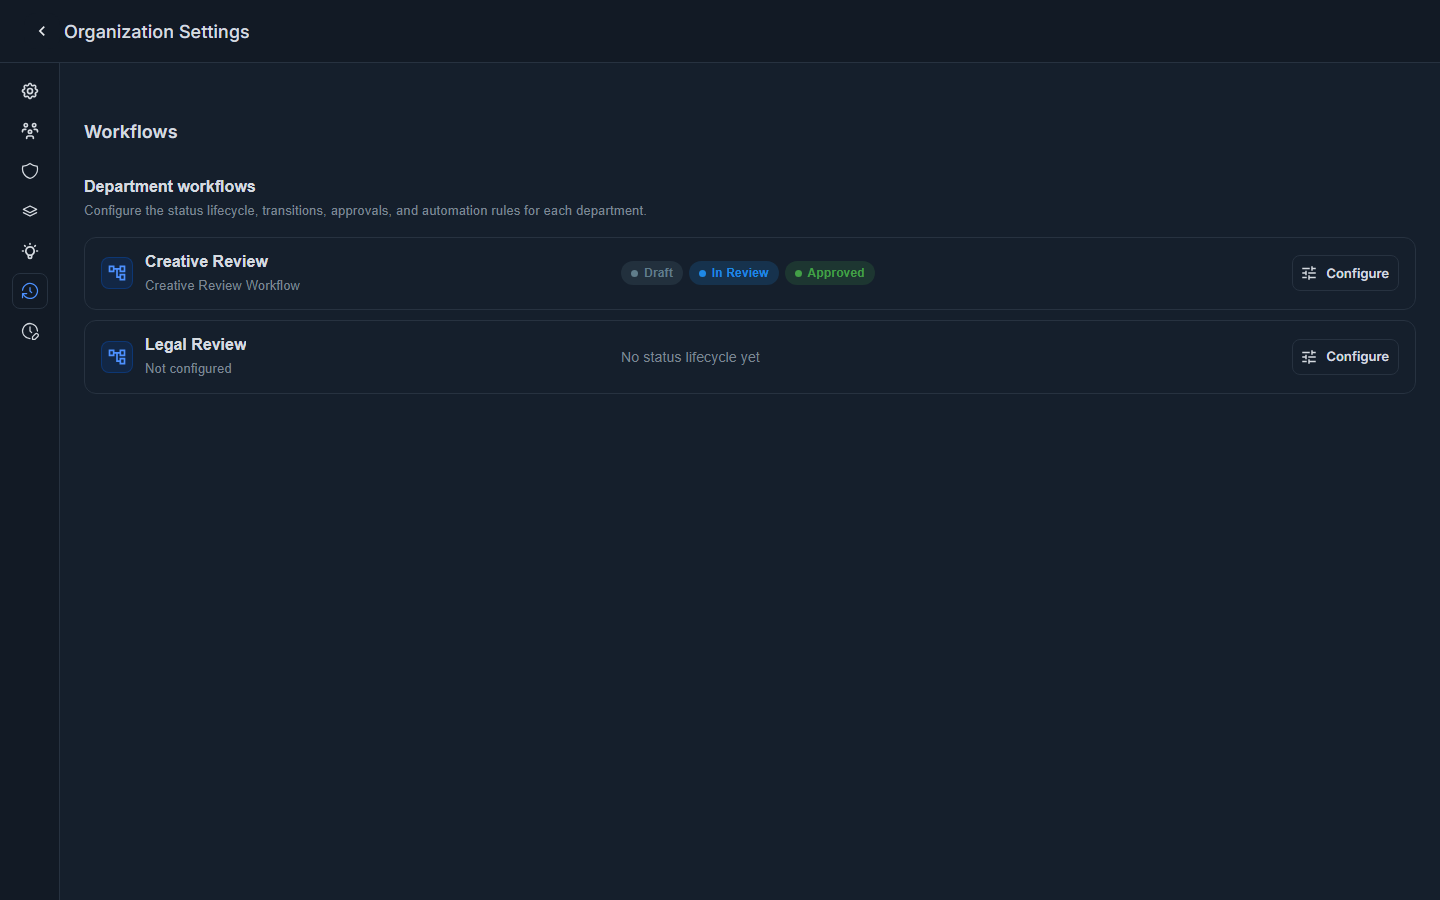
Each department appears as a card. A configured department shows its workflow name and status count. An unconfigured department shows a setup state and a Configure action.
Create A Workflow
Use this flow when a department does not have a workflow yet.
- In Organization Settings -> Workflows, find the unconfigured department.
- Select Configure.
- In the empty workflow editor, select Create workflow.
The empty editor looks like this before the workflow is created:
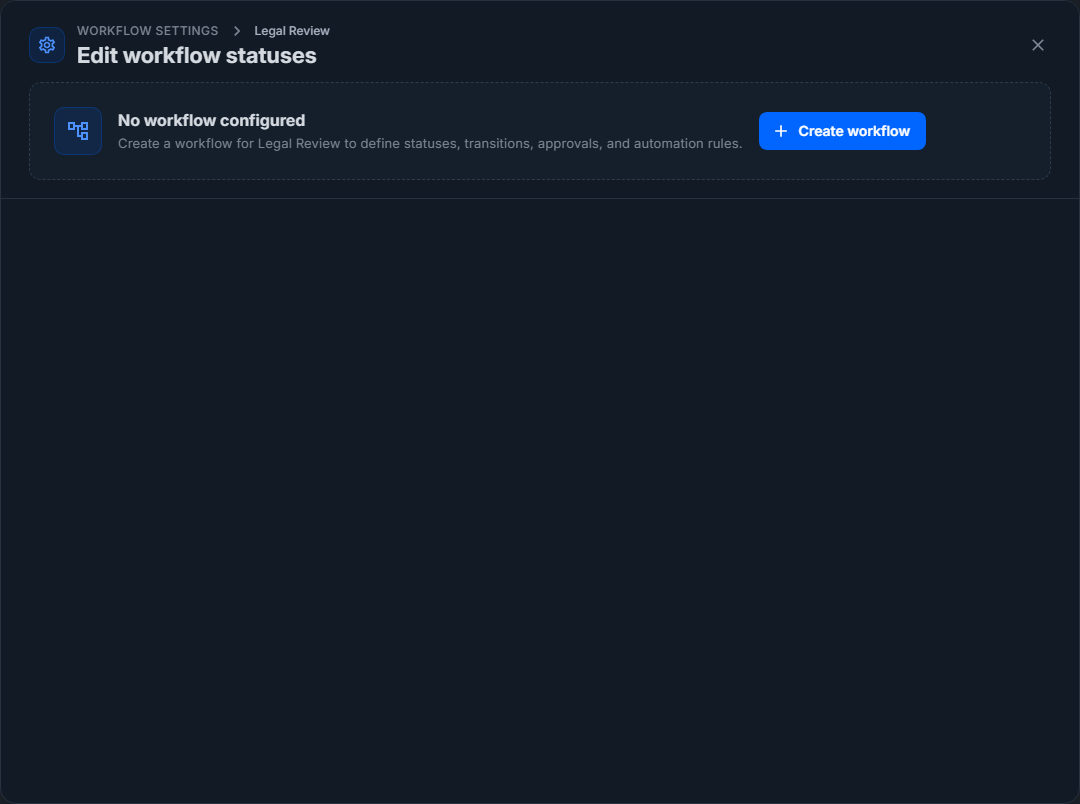
After you select Create workflow, Captionator creates a starting workflow for that department. The default workflow name uses the department name, and the editor starts with three statuses: New, In Review, and Approved.
- Rename the workflow if needed.
- Adjust the statuses, transitions, approval gates, or rules.
- Select Save changes.
Nothing is persisted until Save changes is selected. If you select Cancel, the editor closes and discards unsaved edits from that modal session.
Edit An Existing Workflow
Use this flow when a department already has a workflow.
- Open Organization -> Workflows.
- Find the department card.
- Select Configure.
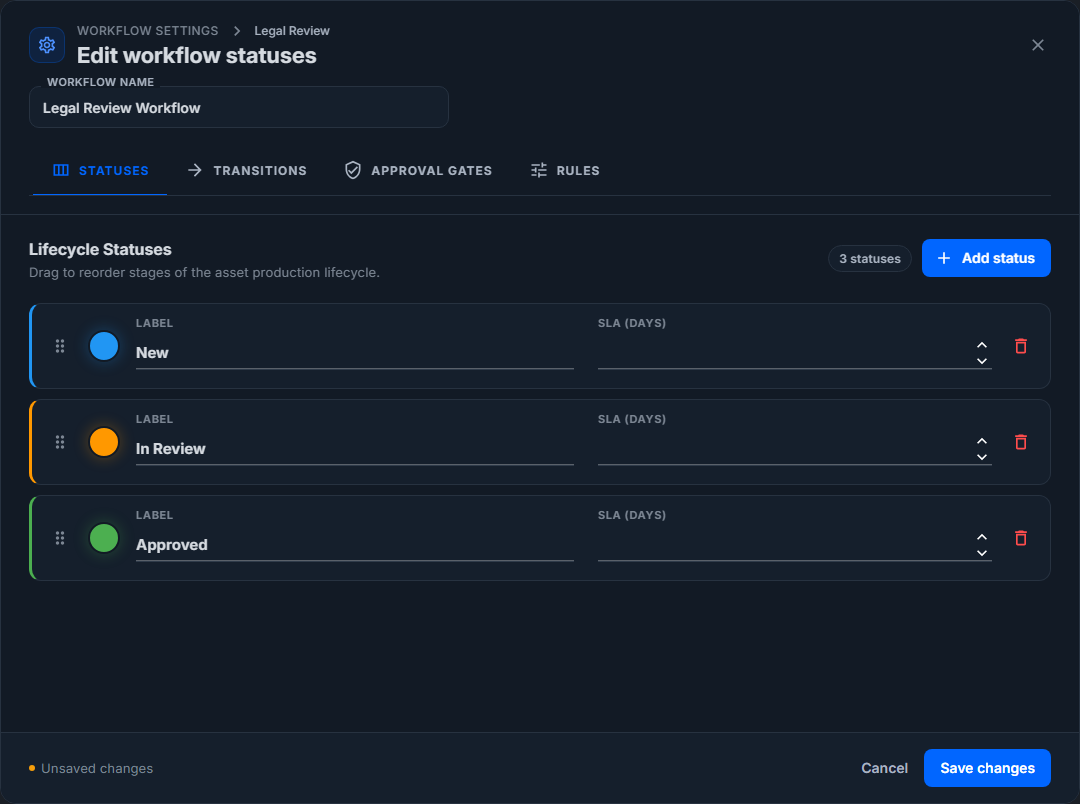
The workflow editor opens on Statuses first:
The editor has four tabs:
- Statuses controls the visible stages of work.
- Transitions controls which moves are allowed.
- Approval Gates controls required sign-off.
- Rules controls workflow automation.
The footer shows Cancel and Save changes. When the editor detects a change, it shows an unsaved-changes indicator. Select Save changes to persist everything from all tabs together.
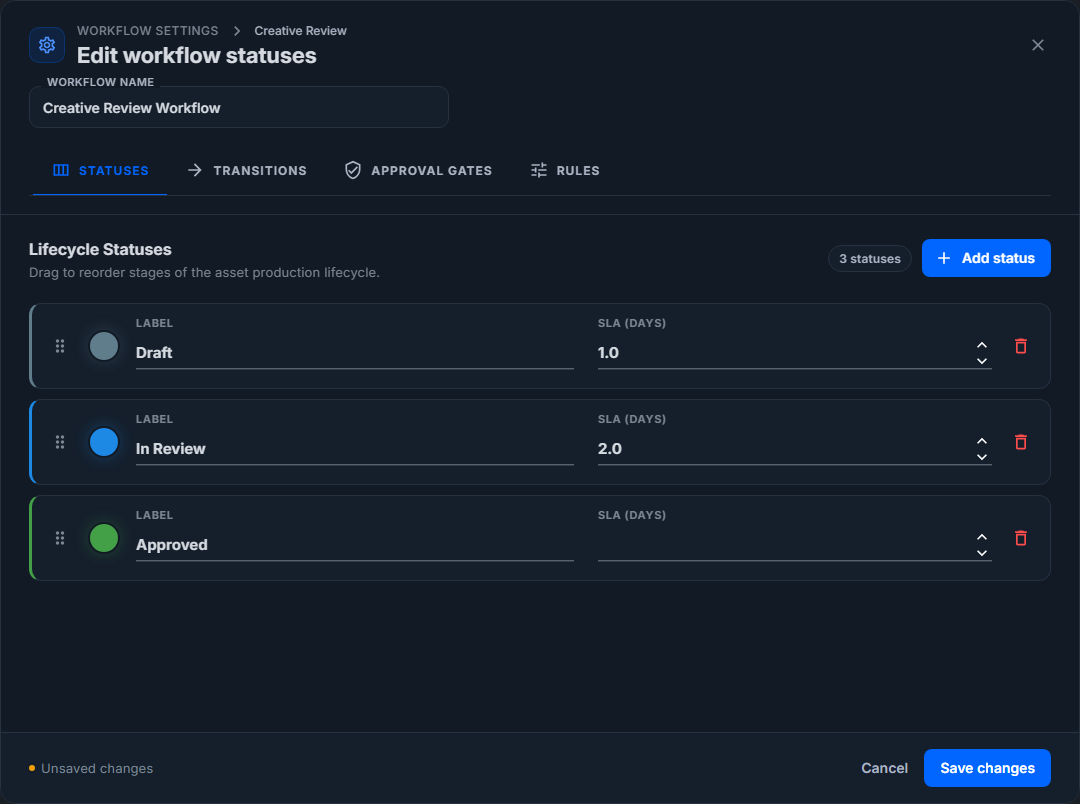
Statuses
Statuses are the lifecycle stages users see on workflow cards and Kanban lanes.
Use the Statuses tab to:
- Rename each status.
- Choose the color used for the status chip or lane.
- Set an optional SLA in days.
- Add a new status.
- Reorder statuses with the drag handle.
- Delete a status from the workflow definition.
Add A Status
- Open the Statuses tab.
- Select Add status.
- Enter the status name.
- Choose a color if the default color is not right.
- Enter an SLA in days if that status should have a timing target.
- Select Save changes when the workflow is ready.
The new status appears at the end of the list. You can drag it into the right position before saving.
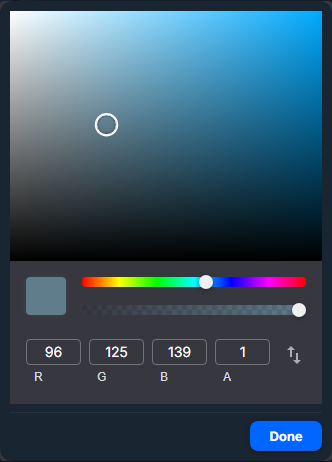
Change A Status Color
- Select the color dot on the status row.
- Pick the color you want.
- Select Done or click outside the color picker.
The color picker is small and local to the status row:
Reorder Statuses
Use the drag handle on the left side of each status row. Drop a row above, between, or below the other statuses. Dropping below the final status moves that status to the end.
Use this when the process order changes. For example, moving Published after Approved makes the Kanban board read in that final review order.
Delete A Status
Select the delete icon on the status row. The status is removed from the unsaved editor state. Review transitions, approval gates, and rules before saving, because deleting a status can make related configuration invalid or obsolete.
Transitions
Transitions define the controlled moves between statuses. They are most often used for forward movement, approvals, published-state locks, and any move that needs role limits, comments, or approval gates.
Reverse movement is implied by the status order unless you define a custom rule for that reverse move. For example, if the workflow allows New -> In Review, users can normally move the item back to New without creating a separate reverse transition. Add an explicit reverse transition only when that backward move needs special behavior.
Open Transitions to see the graph preview and transition cards:
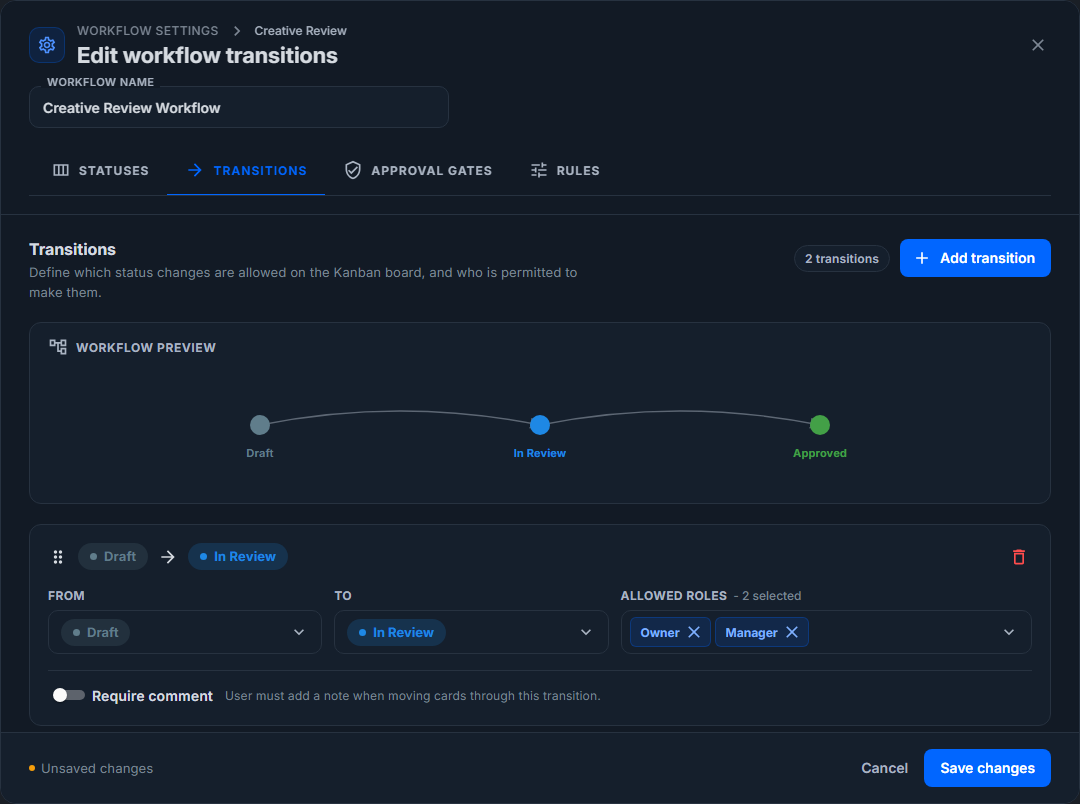
Each transition card has these controls:
- From: the starting status.
- To: the target status.
- Allowed roles: who can perform the move.
- Require comment: whether the user must enter a comment before the move is accepted.
Implied Reverse Pathways
Use implied reverse pathways for ordinary backtracking, such as:
- In Review back to New when an item was submitted too early.
- Needs Fixes back to In Review after the revised file is ready.
- Approved back to In Review when a minor issue is found before release.
These reverse moves keep the workflow easy to maintain. You do not need to add a separate reverse transition for every forward transition unless the reverse move has different rules.
Custom Reverse Transitions
Create a custom reverse transition when a backward move is sensitive. A common example is restricting published work:
- From: Published
- To: Approved
- Allowed roles: Admin
- Require comment: on
Use this when a published item should be rolled back only by an admin and only with a written reason. Once the custom reverse transition exists, that explicit rule controls the move instead of the general implied reverse behavior.
Add A Transition
- Open the Transitions tab.
- Select Add transition.
- Choose the From status.
- Choose the To status.
- Pick the allowed roles.
- Turn on Require comment when the move needs a reason.
- Select Save changes when the workflow is ready.
The preview graph updates as you add transitions. Forward transitions curve one way and custom backward transitions curve the other way, so users can quickly see where the workflow has special review loops such as Published back to Approved.
When To Require A Comment
Require a comment when the move creates a decision that teammates may need to understand later. Common examples:
- In Review -> Needs Fixes
- In Review -> Approved
- Approved -> Draft
If the move is routine, such as Draft -> In Review, a required comment may slow the team down.
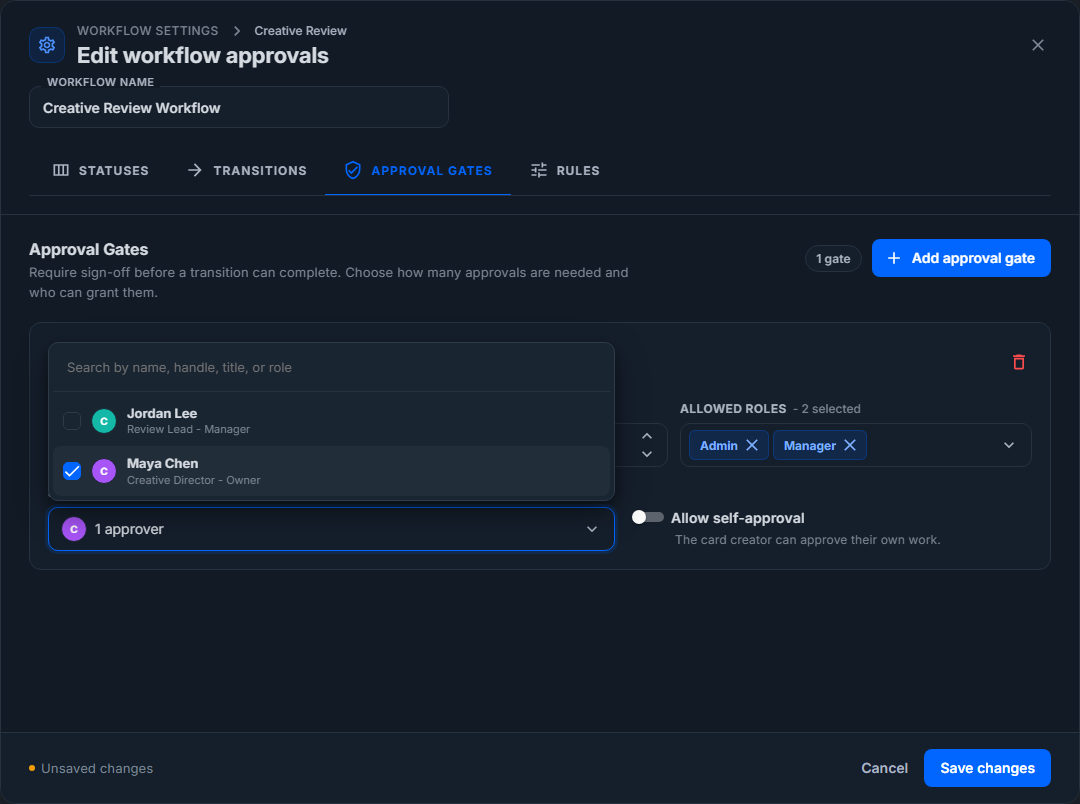
Approval Gates
Approval gates add sign-off requirements to specific transitions.
Open Approval Gates to configure who must approve a move:

Each approval gate has these controls:
- Applies to transition: the transition protected by the gate.
- Required approvals: how many approvals are needed.
- Allowed roles: which roles can approve.
- Specific approvers: named people who can approve, if you want to narrow the approval pool.
- Allow self-approval: whether the person who submitted or owns the work can approve their own item.
Add An Approval Gate
- Open the Approval Gates tab.
- Select Add approval gate.
- Choose the transition.
- Enter the number of required approvals.
- Choose allowed roles.
- Add specific approvers if only certain people should approve.
- Decide whether self-approval should be allowed.
- Select Save changes when the workflow is ready.
The specific approver picker shows organization users by display name, handle, title, and role. It should not ask users to type or recognize raw internal IDs.
Approval Gate Tips
Use approval gates sparingly. They are best for final or high-risk transitions, such as In Review -> Approved or Approved -> Published.
If a transition already requires a comment, keep the approval rule simple unless the team truly needs both a written reason and formal approval.
Rules
Rules automate repeated workflow steps. A rule has three parts:
- Trigger: when the rule starts evaluating.
- Conditions: optional checks that must be true.
- Actions: what the rule runs.
Open Rules, then select Add rule. The builder opens as one vertical card so the trigger, conditions, and actions stay visible together.

Choose A Trigger
Pick the event that starts the rule:
- Status changed starts when an asset moves between statuses. Use it for actions like notifying admins when an item becomes Approved or tagging an item when it moves to Published.
- Assignment changed starts when an asset is assigned or reassigned. Use it to notify a new assignee, add a routing tag, or move reassigned work into a manager review queue.
- Due date approaching starts from a due-date timing rule. Use it for reminders before time-sensitive reviews are late.
- Approval decision starts when an approval is granted or denied. Use it for follow-up notifications or routing after a formal decision.
- Media uploaded starts when a new asset enters the workflow. Use it to tag, assign, or move new work into the right review library.
- Comment added starts when someone comments on an asset. Use it for escalation when comments indicate a decision, blocker, or requested change.
Add Conditions
Conditions limit when the rule runs. Empty conditions mean the rule applies to every event that matches the trigger.
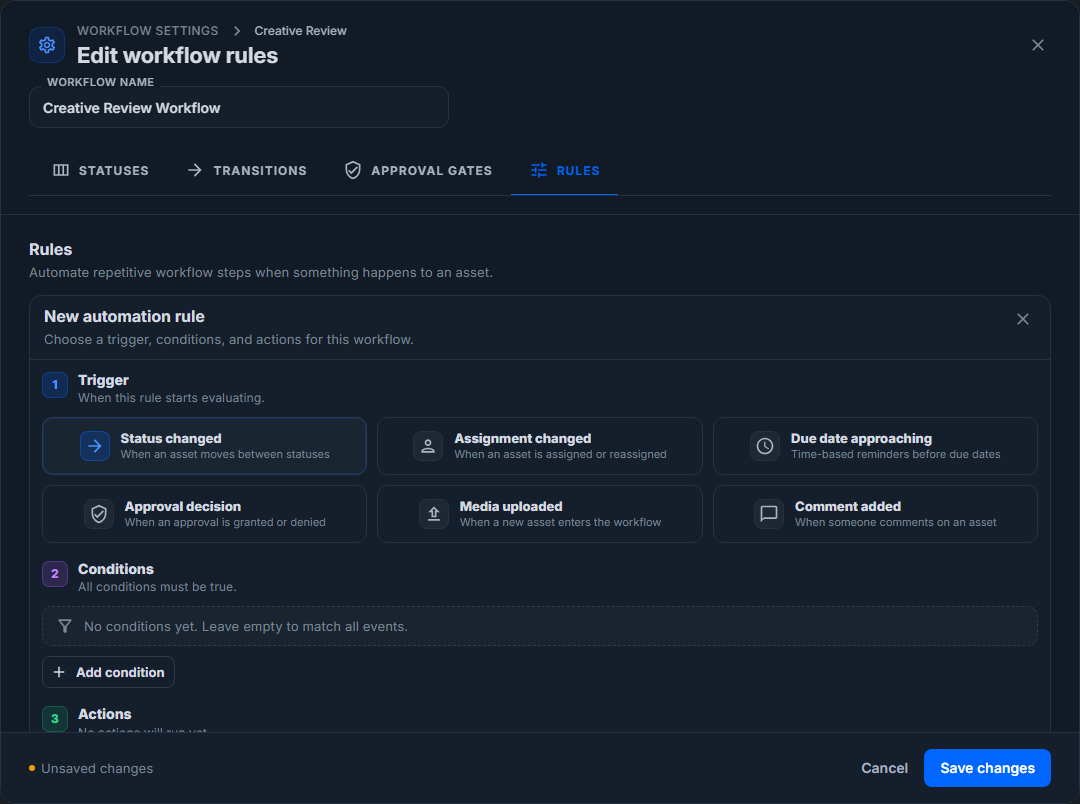
A condition row has three parts:
- Field: the thing to check.
- Operator: the comparison to use.
- Value: the status, person, date, media type, tag, or text value to compare.
Available condition fields include:
- Status: use when the rule should apply only in a specific stage, such as In Review, Approved, or Published.
- Assignee: use when a rule should apply to work owned by a specific person. This field uses the searchable user picker, so users select names rather than typing IDs.
- Due Date: use for date-based reminders or escalation rules.
- Media Type: use when images, PDFs, audio, or video should route differently.
- Tags: use when tags such as
urgent,legal, orneeds-copyshould control automation.
Available operators depend on the field. Common operators include Equals, NotEquals, Contains, Before, After, IsNull, and IsNotNull. Use AND when every condition must be true. Use OR when any one condition can match.
Example conditions:
- Status Equals Approved for a publish-readiness notification.
- Due Date Before a selected date for an upcoming-deadline reminder.
- Assignee Equals Maya Chen for an owner-specific routing rule.
- Tags Contains
legalfor work that needs legal review. - Media Type Equals
Imagefor image-only creative review automation.
Add Actions
Every saved rule needs at least one action.
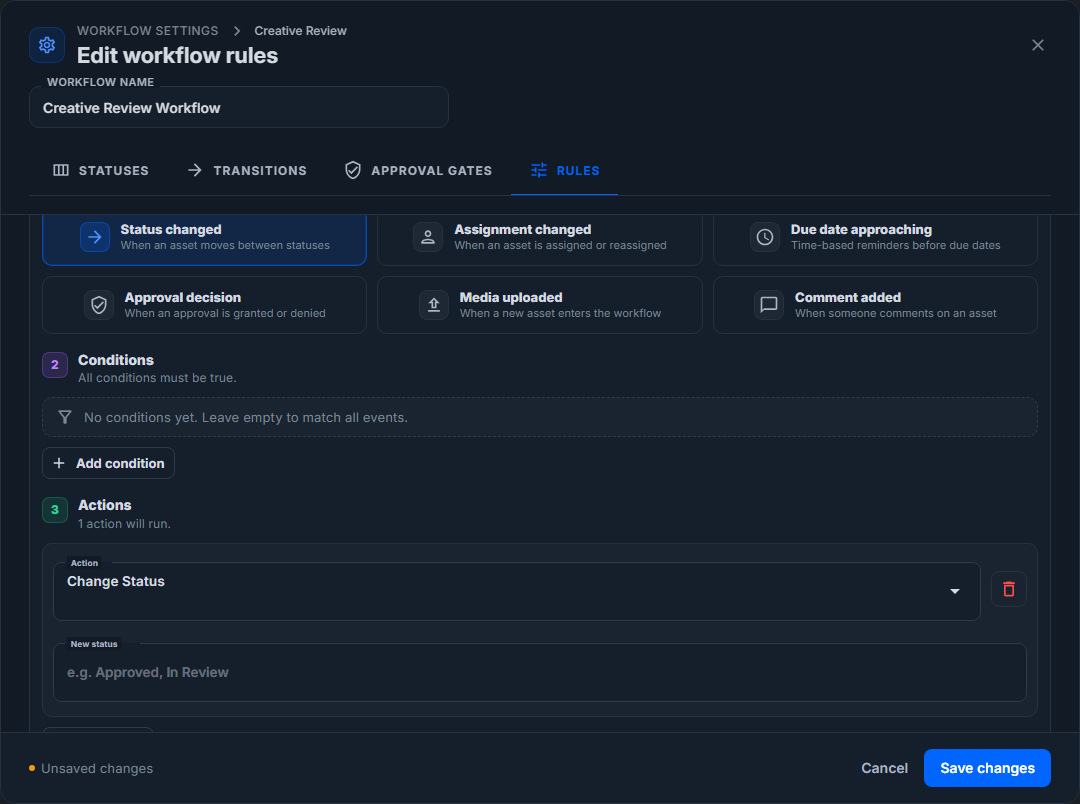
Visible action types include:
- Change Status: moves the asset to a named workflow status. Use it when a rule should advance or reset work after a known event.
- Assign To: assigns the asset to a specific user, the least-loaded person with a selected role, or the original uploader. Use it for intake triage and workload balancing.
- Send Notification: sends an in-app notification, email, or both. Recipients can be the assignee, all admins, the uploader, or all organization members.
- Add Tag: adds a tag to the asset. Use it to mark items for later filters, exports, or team queues.
- Move to Library: moves the asset to another library. Use it when approved assets should move into a delivery, archive, or published-assets library.
When an action targets a user, use the searchable user picker. Users should see names, handles, titles, and roles. They should not need to type or recognize a raw internal ID.
Example Rules
Use these examples as starting points:
- Notify admins when work is approved
- Trigger: Status changed
- Conditions: Status Equals Approved
- Actions: Send Notification by email or in-app to All Admins
- Route new image uploads to a review lead
- Trigger: Media uploaded
- Conditions: Media Type Equals
Image - Actions: Add Tag
creative-review, then Assign To By Role (least loaded) Manager
- Escalate work nearing its due date
- Trigger: Due date approaching
- Conditions: Status Equals In Review and Due Date Before the selected deadline
- Actions: Send Notification to Assignee, then Add Tag
due-soon
- Send denied approvals back to review
- Trigger: Approval decision
- Conditions: Status NotEquals Approved
- Actions: Change Status to In Review and Send Notification to Uploader
- Flag tagged legal work
- Trigger: Comment added
- Conditions: Tags Contains
legal - Actions: Move to Library Legal Review and Send Notification to All Admins
Save A Rule
- Pick the trigger.
- Add conditions if needed.
- Add at least one action.
- Select Save rule.
- Review the rule card.
- Select Save changes in the workflow editor footer.
Saving the rule adds it to the unsaved workflow modal state. The workflow itself is not persisted until you select Save changes.
Connect A Workflow To A Library
A workflow must be attached to a library before users can use it on library media.
- Open the target library.
- Select the library settings menu.
- Select Edit Library.
- Select Workflow in the settings drawer.
- Choose the workflow in Select Workflow.
- Review the workflow statuses.
- Select Save.
The library workflow settings look like this:
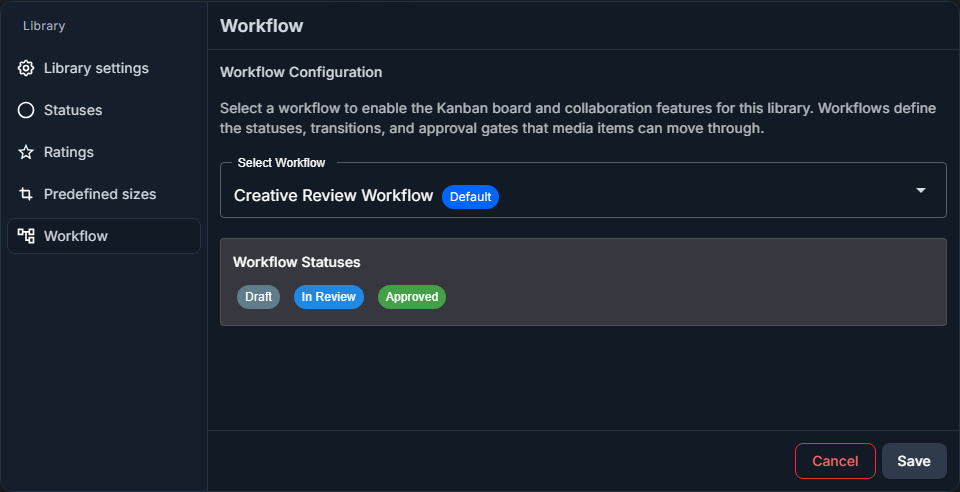
Once the workflow is selected, the library settings page shows the statuses that will become workflow lanes and chips.
Use The Workflow On The Kanban Board
After a workflow is attached to a library, open the library and select Kanban view.
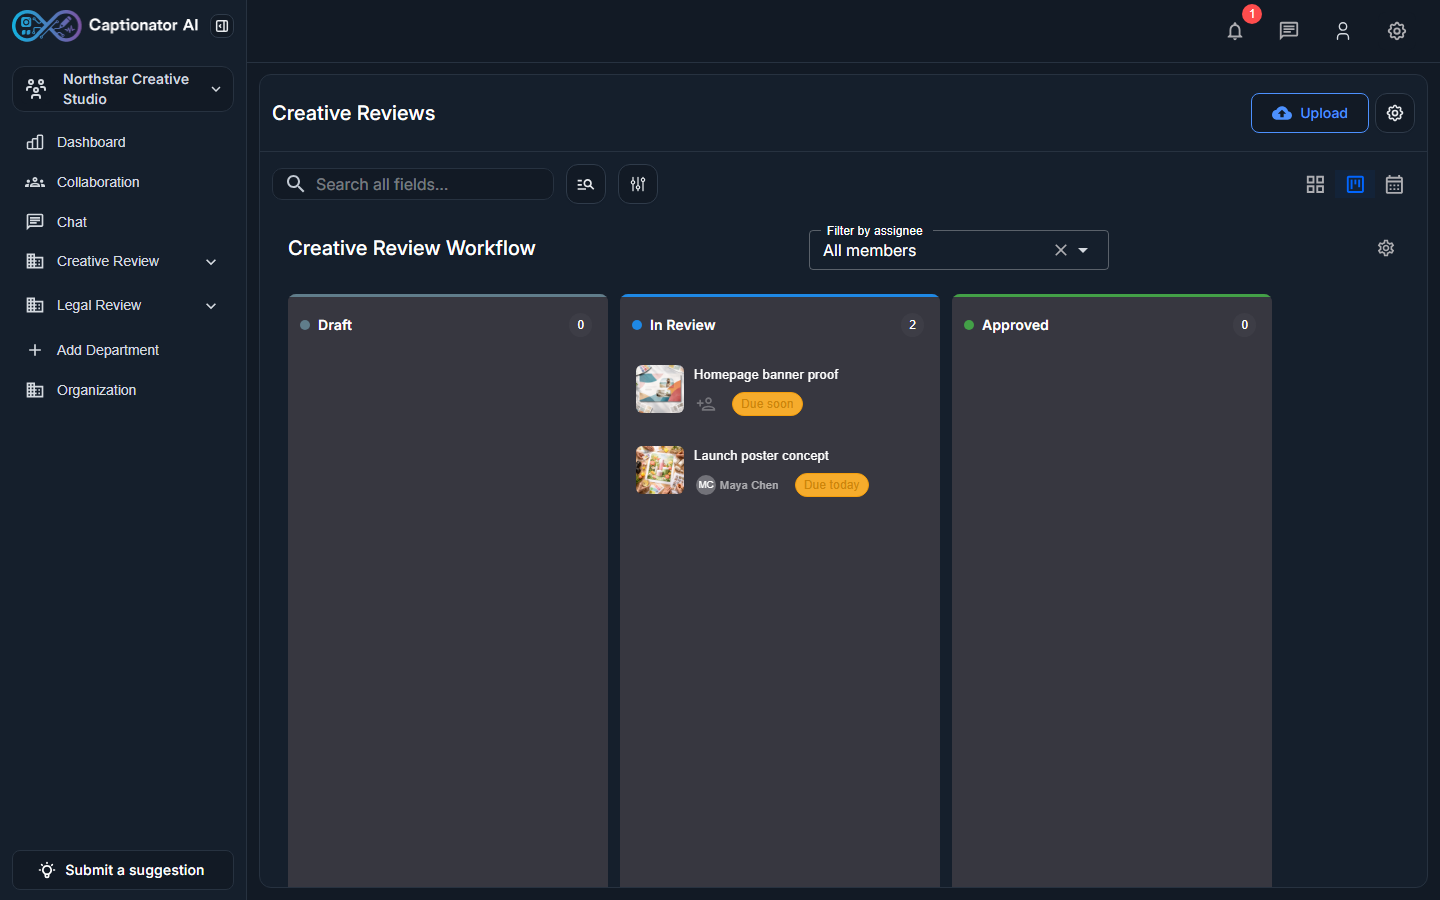
The Kanban board uses the workflow definition:
- Each workflow status becomes a lane.
- Media cards show their current workflow status.
- Dragging a card attempts a workflow transition.
- Undefined forward transitions are rejected.
- Comment-required transitions open a comment prompt.
- Approval-gated transitions require the configured approvals.
If a forward drag does not work, check the workflow's Transitions tab first. Forward moves normally need a defined transition. If a backward drag does not work, check whether a custom reverse transition exists and whether your role is allowed to use it.
Common Questions
Why did my workflow edits not appear after I closed the modal?
Changes are saved only after you select Save changes in the workflow editor footer. Saving a rule inside the Rules tab is not enough by itself.
Why can I not move a card to another Kanban lane?
The workflow probably does not have a forward transition for that move, or a custom reverse transition is limiting who can move backward. Open the workflow, go to Transitions, and review the From -> To move.
Why is a transition asking for a comment?
The transition has Require comment turned on. Turn it off in the transition card if the team no longer needs a written reason for that move.
Why does a move need approval?
An approval gate is attached to that transition. Open Approval Gates to see the required approval count, allowed roles, specific approvers, and self-approval setting.
Should I delete old statuses?
Delete a status only after checking whether active media, transitions, approval gates, or rules still depend on it. Renaming or reordering is safer when the process changed but the underlying stage still exists.
Next Steps
After the workflow is saved and attached to a library, review the library in Kanban view with the people who will use it every day. Confirm that each lane matches the team's real process, then adjust statuses, transitions, gates, or rules before the workflow becomes part of a larger review routine.